Deploying a Node.js GraphQL API to Azure
GraphQL is a very trending topic at the moment. Next to Facebook who developed GraphQL, also Github announced to change their API´s from REST to GraphQL. This adoption might convince more and more companies to trust in GraphQL for building their API´s. A good time to take a deeper look at the whole topic.
I played a bit with GraphQL and wanted to deploy it somewhere so I can consume my API from a demo application. I already deployed some REST API´s to Azure, therefore I wanted to publish my GraphQL API in the same manner. This post is a summarization of my attempts and the explanation how you can create a simple GraphQL API and deploy it to Azure like i did.
One great thing on Azure (and surely also other cloud providers) is, that you don`t have to pay for small deployments and usage. Perfect for play projects :) In case you don´t have an Azure account yet, you can follow this video for creating your subscription.
I started learning GraphQL with the site Learn GraphQL and using the official documentation and can highly recommend them. The shown example API is the same like on learngraphql.com.
Installing packages and TypeScript
I am using Node.js because it is very uncomplicated and lightweight. I installed the recommended packages like express-graphql from the GraphQL documentation. Next, to that, you have to install graphql itself.
npm install graphql express express-graphqlBecause we are writing ES6 code we need a transpiler to convert our files to ES5 JavaScript.
Instead of Babel I used TypeScript for this. On the server the TypeScript type system provides not that much benefit (in fact in this simple example it is not even used) because GraphQL comes with its own type system. But in case you are using TypeScript for the client you are able to generate typing definitions files out of the GraphQL types. This is really handy because you don´t need to write all the d.ts files yourself.
Install TypeScript on your system and download all needed typings.
npm install -g typescriptnpm install typingstypings install express graphql --saveCreating the GraphQL API
After this, we can start with creating our server.ts file and import all needed resources for creating the web server and the API.
import * as express from 'express';
import * as graphqlHTTP from 'express-graphql'
import {
  // These are the basic GraphQL types
  GraphQLInt,
  GraphQLFloat,
  GraphQLString,
  GraphQLList,
  GraphQLObjectType,
  GraphQLEnumType,
  GraphQLNonNull,
  GraphQLSchema,
  graphql
} from 'graphql';
Next we create a simple GraphQL schema.
let query = new GraphQLObjectType({
  name: 'RootQueries',
  fields: () => ({
    echo: {
      type: GraphQLString,
      args: {
        message: {type: GraphQLString}
      },
      resolve(rootValue, args) {
        return `received: ${args.message}`;
      }
    }
  })
});

let schema: GraphQLSchema = new GraphQLSchema({
    query: query,
});

graphql(schema, query).then((result) => {
    console.log(result);
});
The last thing we now have to do is setting up the express web server. This is quite simple, we just create the express application, define the endpoint, configure the schema and add a port to listen on.
var app: express.Application = express();
app.use('/graphql', graphqlHTTP({
 schema: schema,
 graphiql: true
}));

app.listen(4001, () => console.log('express server works'));
Well, wasn´t that easy? Now we can transpile and execute it with node.
tsc server.tsnode server.jsThe API is now up and running under localhost:4001. Because of the option graphiql: true we see a
nice interface where we can use autocompletion to execute queries.
Deployment to Azure
We are now going to publish this API and access it over Azure instead of localhost. For this, you need to create a Node.js application, download the PublishProfile and upload your files.
There are several ways to work with Azure and this makes it sometimes hard to find the right documentation. I prefer using various GUI´s and never even tried to use the Azure Powershell. Therefore is what I am describing next only one of many ways to do this.
Create the Node.js application
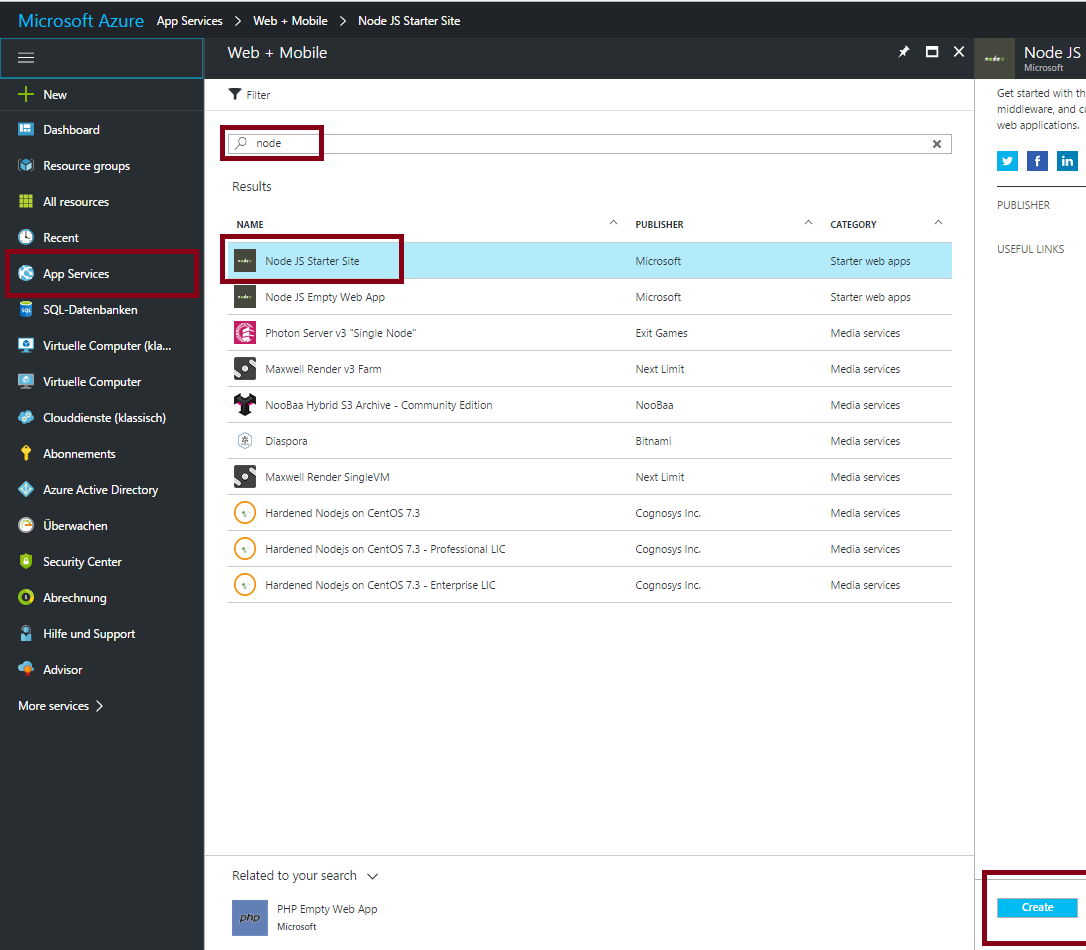
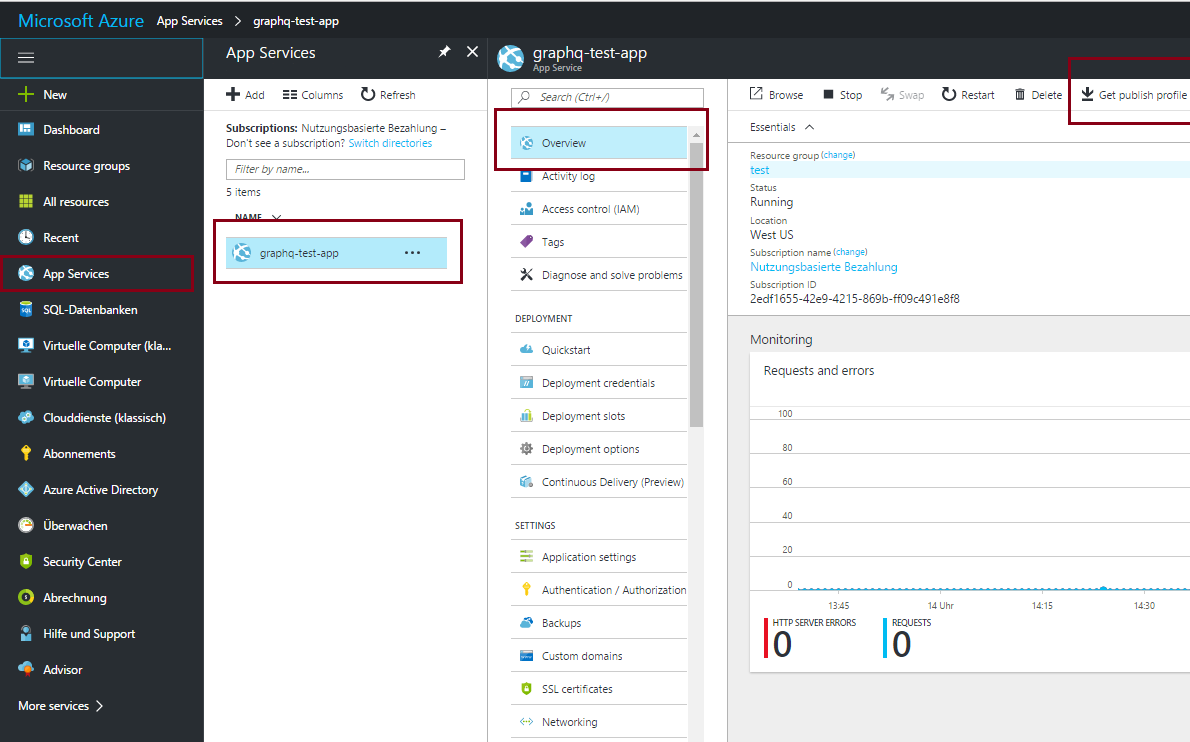
First, you have to go to your Azure account and create a Node.js web application. You can orientate on the pictures below or you can have a look at this channel9 video for a complete guide.

When creating your app make sure that you choose the free pricing tier. After you created your app service you can navigate to it and download the publish profile.

Open the .PublishSettings file and connect to your app service with an FTP client.
For deploying your code, you have to copy your server file and the whole node_packages folder. If you named your server file other than server.js you have to change the web.config accordingly.
This files lays in the root directory and defines how your server will be executed.
Now you can try to access your API over http://<your-app-name>.azurewebsites.net/graphql (in this example, http://graphql-test-app.azurewebsites.net/graphql) and see if it works.
If you do so you will likely see some error page that tells you exactly nothing helpful.
Pitfalls
It happened several times to me that I copied my files to Azure and it wasn´t working. In this case you can add multiple logging statements for debugging in the iisnode.yml file to see some more detailed error messages.loggingEnabled: true
devErrorsEnabled: trueIn case you chose the Node.js Starter Site you can also take a look at the default application. Find out how the existing application is working and what you may did wrong. Otherwise, you can find some example applications on Github.
Taking a look at this helped me to find out that I forgot to change the port to the one that Azure provides. So you need to change your code to use process.env.port.
var port = process.env.port || 4001;
app.listen(port, () => console.log('express server works'));
You can find this information also somewhere in the documentation, but I only found the problem by looking at the initial server.js file.
Consume your API
The deployment to Azure was quite easy and you are now ready to extend and consume your API from a client. For further development of your API I would recommend integrating the GIT deployment. Thus, Azure gets the new files as soon as you push changes to your repository.
Hopefully these explanations might help someone to get started with developing great API´s. I am excited to see how GraphQL will change the way we build applications, handle and consume data.
Found some typo, want to give feedback or discuss? Feel free to contact me :)